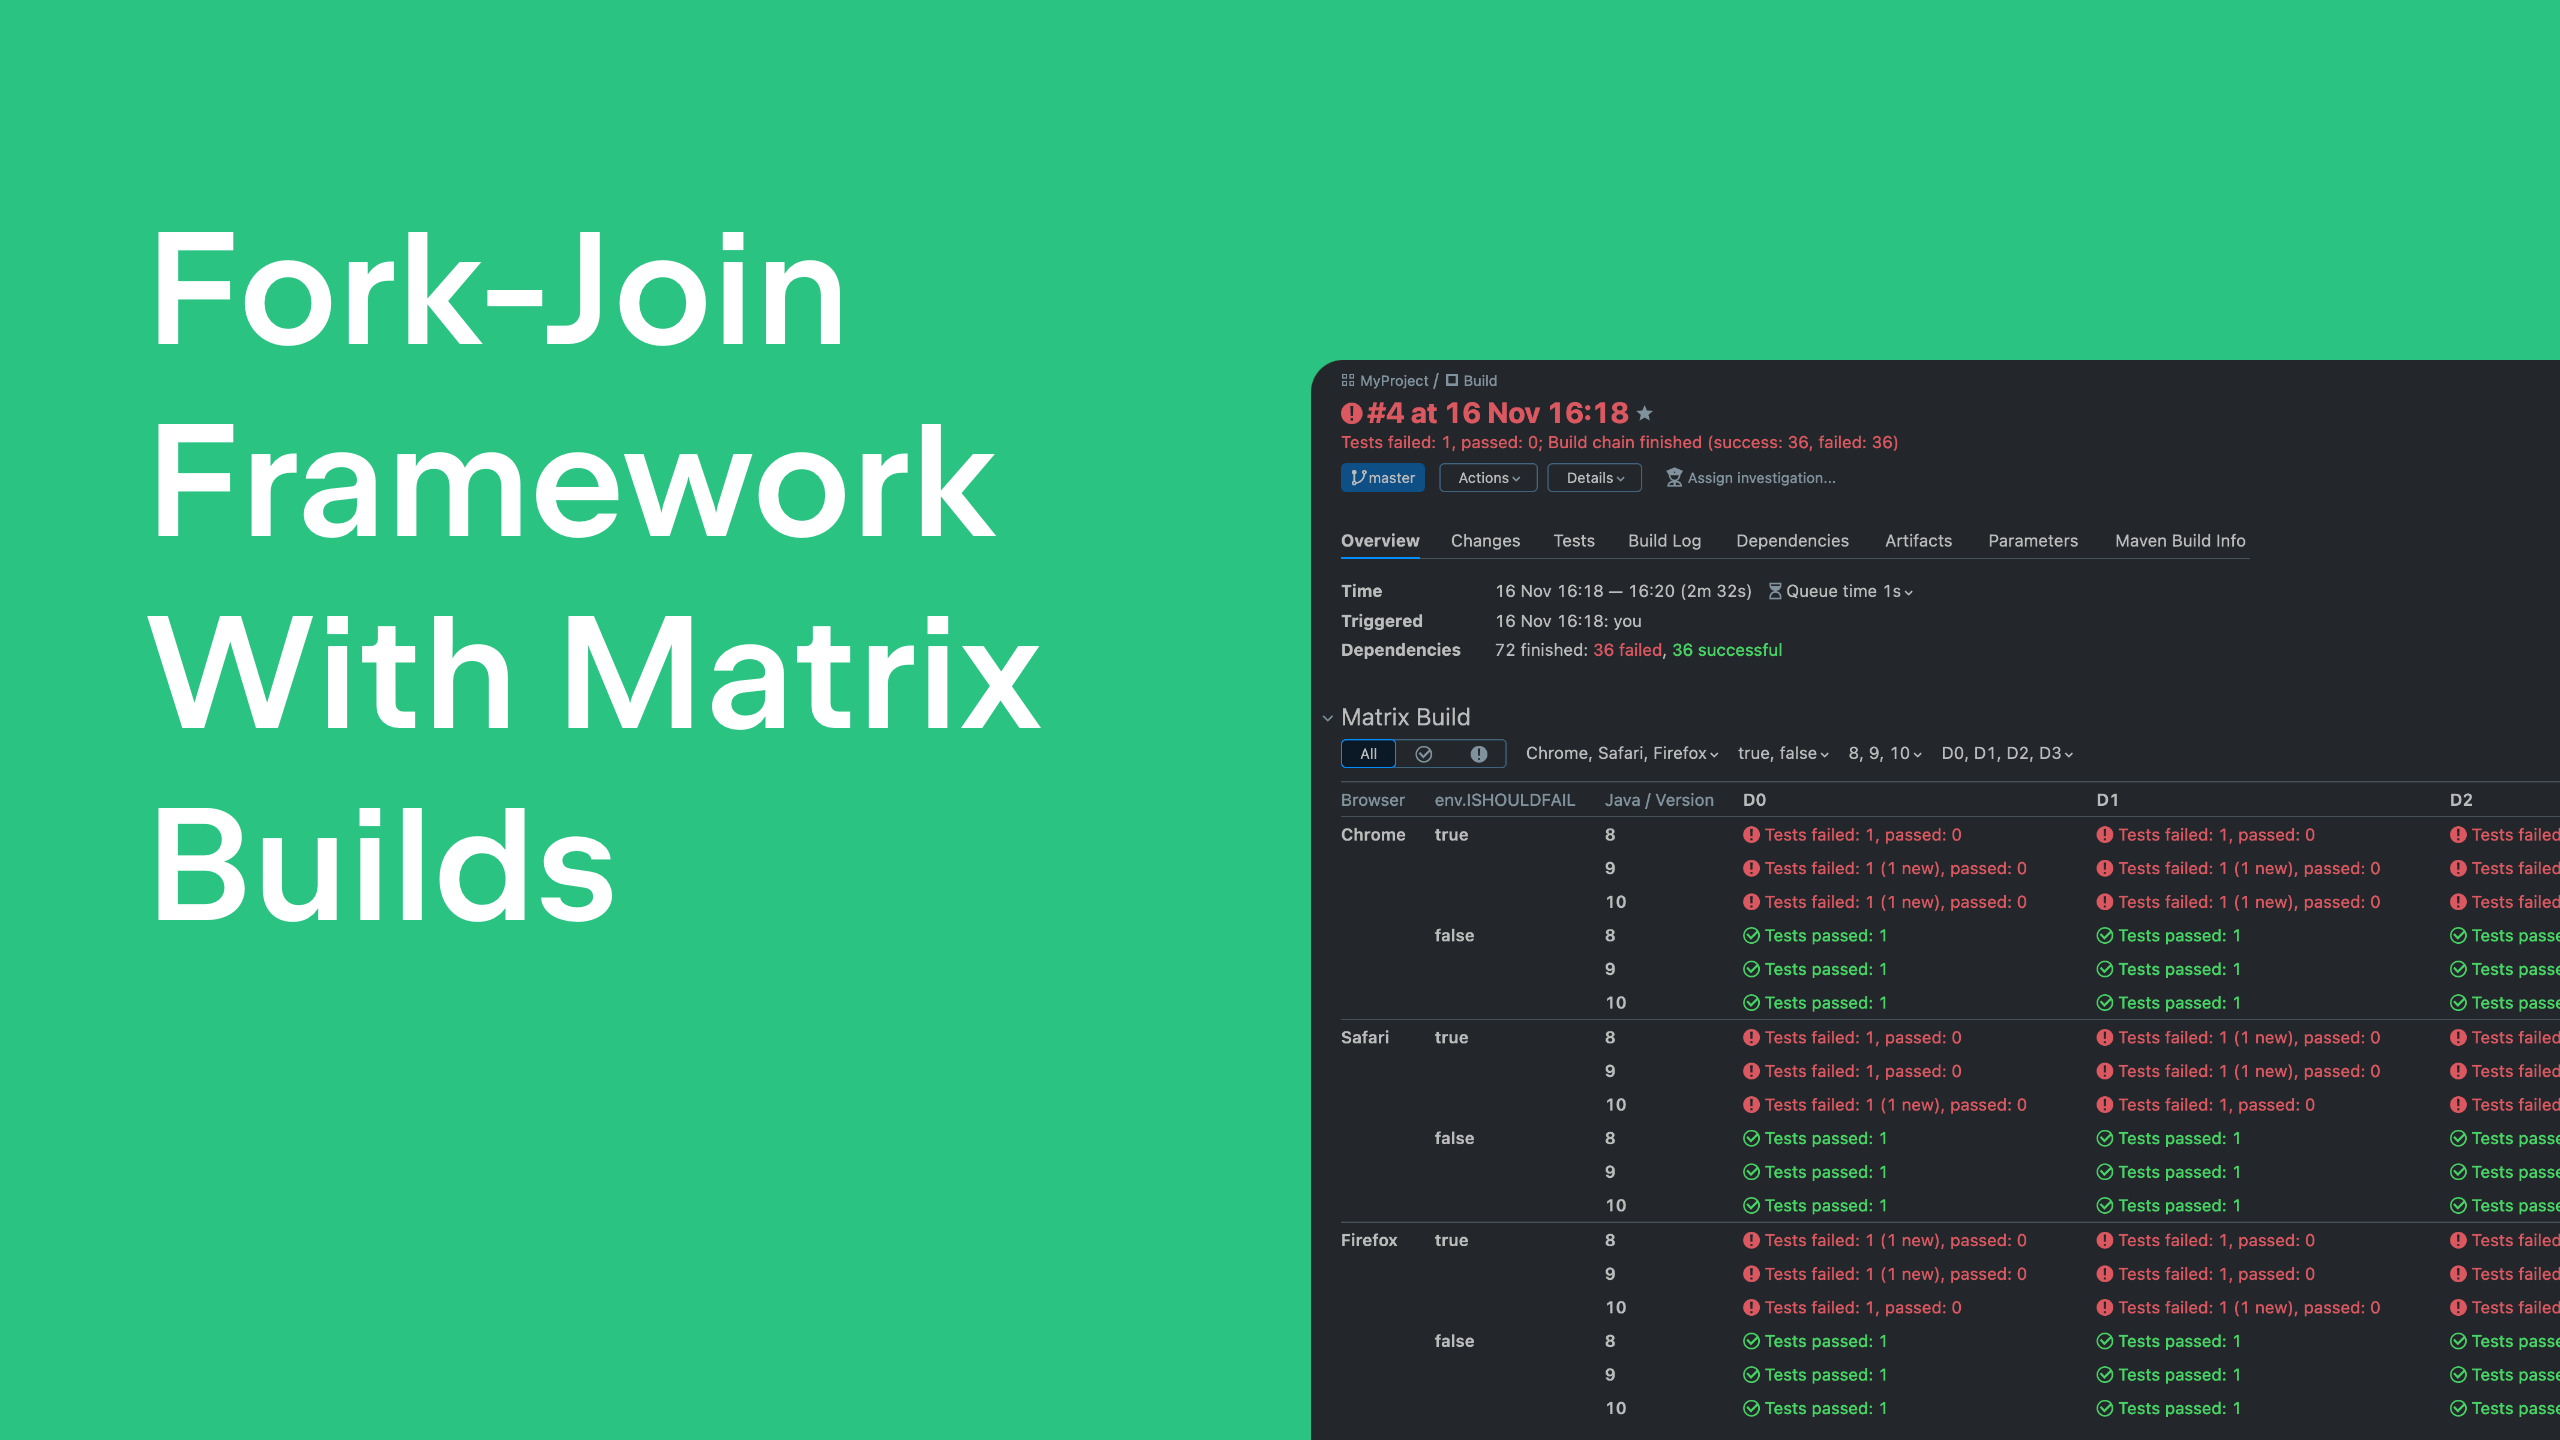
Archive for the ‘How-To's’ Category

Get Notified about Builds Status in Google Talk

Thursday, October 21st, 2010

This isn’t a brand new feature, but one might not yet know that besides email, Jabber, rss, IDE and Windows tray notifications, you can configure TeamCity to sent notifications about builds status via Google Talk instead of Jabber.

The only thing you need to do is to set the following options on the Administration | Server Configuration | Jabber Notifier tab:

  • Server: talk.google.com
  • Port: 5222
  • Server user/password to send notifications from.

Note, that if you use Google Apps for domain, you should specify full username with domain part in the Server user field. Naturally, these settings are available only for System Administrators.
As with the rest notifiers, you can tune up the messages sent: the FreeMarker templates used for generating them are fully customizable (refer to our docs for the details).
Once this is done, a user will need only to specify his account and notification rules at My Settings&Tools | Jabber notifier tab to subscribe to Google Talk notifications.

Enjoy!

Overriding Template Settings

Thursday, October 14th, 2010

It’s quite a typical case when you need to create several more or less similar build configurations in TeamCity, for example, to run builds in different environments, or create a separate build configuration for release builds, etc. Of course, you can simply copy build configurations, but what if you’ll need to change, for example, a VCS root in all of them? Naturally, you’ll have to manually change it in every configuration. Don’t you think it’s too much of routine work? We thought so too, that’s why in TeamCity there are build configuration templates. You can create a template with common (shared) settings and then inherit any number of build configurations from this template, or you can extract a template from any of your existing build configurations. Thus, when you’ll need to change some setting in all template-based configurations, you’ll just change it in the template.

One might ask what to do if you need to override a setting inherited from a template in one of the build configurations. If your template defines a specific value for this setting, every template-based configuration will have the same value and since it’s inherited it’ll be a display-only field. But there’s a trick! You can use a configuration parameter instead of an actual value in the template. Basically, such parameter is used inside TeamCity only, and it is not passed to an actual build, but it provides you with means to make your templates flexible.
Here’s an example to illustrate how it works. Let’s say I need to redefine Maven goals in my build configurations based on the same template. In the template settings, instead of actual goals I’ll introduce a configuration parameter:

Note, the syntax here is elementary – %ParameterName%. Now, if I’ll go to the Properties and Environment Variables section, I’ll see there this configuration parameter.

I can define a default value for goals, or leave it as is – in this case I’ll have to define it in every child configuration manually. Let’s say, the default should be test.

Now, I’ll switch to the build configuration based on this template where I’d like to have deploy goal instead of test, and redefine it there.

In our docs, you’ll find the list of settings that can and cannot be overridden with configuration templates. However that’s not the only use case for the configuration parameters. Now they are also used as some of the agent’s parameters, for example for .NET Framework/SDK/Visual Studio/Mono detected on an agent. These we’ll describe in detail in the next post, so stay tuned!

Build Agent API Changes

Monday, October 4th, 2010

After our posts about TeamCity’s new multiple build steps (previously called “multiple build runners“) feature and further changes in .NET build runners, I believe that plugin developers might have some questions to be clarified.

So today, I’m going to shed some light on the major agent-side API changes that we’ve made to support multiple build steps. I hope this post will help you to painlessly improve your build runner plugins.

AgentRunningBuild interface no longer represents parameters for a build runner. We’ve introduced new interface BuildRunnerContext that provides parameters for build runner. Starting with TeamCity 6.0 AgentRunningBuild will only describe a build.

Note that there is no getter for BuildRunnerContext in AgentRunningBuild. AgentLifeCycleListener interface now provides BuildRunnerContext in build step related methods.
We’ve added runnerFinished event and updated almost all build-related events signatures to contain AgentRunningBuild and BuildRunnerContext instances. So, in most cases one will not need to cache those instances in a plugin code.

So if you ask yourself, what to do to improve your build runner, the answer is simple. If your build runner is implemented by extending CommandLineBuildService, you need to extend BuildServiceAdapter abstract class. This class contains all getters for all parameters you may need in build runner implementation.

Of course, this post doesn’t cover all the details, but only gives general tips. So don’t hesitate to ask questions, I’ll be glad to answer.

.NET Code Coverage in Two Clicks

Friday, February 19th, 2010

If you have ever dealt with .NET code coverage for NUnit tests, you surely know that it is quite a tricky thing to configure: you need to read docs to properly set up launching a command line coverage tool in your build script; read more docs and configure how reports should be gathered; then read docs again and specify all the needed arguments to be passed… well, not a task anyone would like to deal with.

Now imagine that you can forget all that tangled routine and spend more time doing whatever you like. That’s because starting with TeamCity 5.0 configuring coverage execution with NUnit becomes easy as pie.

All you need to do is to select the preferred coverage tool when creating or editing Build ConfigurationNCover and PartCover are at your disposal; and specify its parameters. That’s it!

Just a few clicks to make TeamCity automatically add necessary arguments to NUnit tests, and ensure you’ll be able to view the results in the TeamCity. Enjoy!

Code Coverage Results

Code Coverage Results

Code Coverage Summary

Code Coverage Summary

Coverage Graph

Coverage Graph

Sincerely,
JetBrains TeamCity team.

Technorati tags: , , , , , , ,

Using TeamCity NUnit Launcher

Wednesday, September 24th, 2008

After not so short break we are back with the next post of our .NET mini-series, and today we are going to tell you about TeamCity NUnit Launcher — a bundled NUnit test runner. In most cases, if you need to use NUnit, all you have to do is just to run it with this Launcher.

As we said in the previous post, to provide tests state tracking and on-the-fly reporting, TeamCity contains several NUnit builds (different NUnit versions) and provides NUnit Launcher to use particular NUnit build for your tests.

To start the NUnit Launcher from any TeamCity build runner, use either the teamcity.dotnet.nunitlauncher NAnt property, or the environment variable of the same name, or the teamcity_dotnet_nunitlauncher MSBuild property. These properties should have the following mandatory parameters:

  • .NET Framework version (both 1.1 and 2.0 versions are supported),
  • The platform to run tests (x86, x64, and MSIL),
  • The test framework version to use. TeamCity supports the following NUnit versions: 2.2.10, 2.4.1, 2.4.6, 2.4.7, 2.4.8, and 2.5.0 (Alpha 3)
  • List of assemblies to test

In addition to the above-mentioned parameters, you can also specify filters by tests category and NUnit addins (for NUnit 2.4 and higher). Filters by tests category allow you to control a set of tests to run, if you use tests grouping by category in your project.

You can find the detailed description of TC NUnit Launcher syntax at TeamCity reference. Here, in this post, we will just illustrate it with the example below.
(more…)

Unfolding TeamCity Addin for NUnit Secrets

Monday, July 28th, 2008

In today’s episode of the NUnit mini-series we’d like to share some information on using TeamCity Addin for NUnit.

As we wrote in our previous post, to provide tests state tracking and on-the-fly reporting, TeamCity bundles NUnit and includes its own NUnit runners. These embedded runners suit most cases perfectly well but there can be situations when you:

  • prefer to use particular NUnit instance (not TeamCity’s bundled) for your particular build configuration
  • want to pass NUnit project file (.nunit)

For cases like these you can use a recently implemented TeamCity Addin for NUnit available in TeamCity 4.0 EAP; the Addin supports the following versions of NUnit: 2.4.6, 2.4.7, 2.4.8 and 2.5.0 Alpha3.

How does it work?
TeamCity Addin for NUnit is embedded in the system by default and contains .dll and .pdb files for each supported version of NUnit. For every build, the main part of a path to the TeamCity Addin is set to the build property and the environment variable of the same name:

  • teamcity.dotnet.nunitaddin for NAnt
  • teamcity_dotnet_nunitaddin for MSBuild

To enable on-the-fly tests reporting, all you have to do is to add a task in your build for copying an appropriate Addin’s files to your NUnit’s addins directory. Type your NUnit version at the end of the TeamCity Addin path using the following syntax:

  • For NAnt: ${teamcity.dotnet.nunitaddin}-<NUnit version>.dll
  • For MSBuild: $(teamcity_dotnet_nunitaddin)-<NUnit version>.dll

In the above filenames, the <NUnit version> parameter can possess the following values: 2.4.6, 2.4.7, 2.4.8, and 2.5.0.

Please note that we recommend to copy TeamCity Addin for NUnit files every time you run the particular build.

The following example for MSBuild shows how to use NUnit console runner with TeamCity Addin for NUnit 2.4.7:


<PropertyGroup>
   <NUnit>Path_to_NUnit_console</NUnit>
   <NUnitAddinsDir>Path_to_NUnit_Addins _Dir</NUnitAddinsDir>
</PropertyGroup>

<ItemGroup>
   <NUnitAddinFiles Include="$(teamcity_dotnet_nunitaddin)-2.4.7.*" />
</ItemGroup>

<Target Name="RunTests">
   <Copy SourceFiles="@(NUnitAddinFiles)" DestinationFolder="$(NUnitAddinsDir)" />
   <Exec Command="$(NUnit) $(NUnitFileName)" />
</Target>


Well, it’s again a time for a break. See you soon!

Technorati tags: , , , , , , , , ,

Managing TeamCity Database

Tuesday, June 3rd, 2008

Here, at JetBrains, we use TeamCity to build all our projects – commercial, open-source, and internal solutions. This is why we understand the value and importance of information that will be kept “inside” TeamCity server as well as the burden of setup, adoption, and maintenance of “yet another server” for your company.This is why we support four major industry-wide databases:

  • MySQL (5.0.40+)
  • PostreSQL (8+)
  • Oracle (10+)
  • Microsoft SQL 2005

to back end your TeamCity server, so you can reuse your existing IT infrastructure in the most efficient way.Â

To ease the evaluation process, TeamCity comes with a built-in pure Java database (HSQLDB) that works out of the box under any environment without any additional configuration. When you evaluate TeamCity to see whether it suits your needs and which benefits it brings, it collects information on the build results and preserves it in this simple built-in database. But because of its simplicity, the database does not scale well and is not targeted on a real production.

Once you decide to handle the software building process to TeamCity and use it for production purposes, you need to switch to one of the supported databases most suitable for your environment and infrastructure. Please note that after initial setup the external database does not require any kind of special maintenance – TeamCity server does everything automatically using the database you have selected, and you control performance, scalability, and safety.

The database switching process is rather simple and straightforward:

  1. Stop TeamCity server.
  2. Back up the TeamCity data directory.
  3. Follow an extensive explanation of this procedure in the Setting up an External Database and Migrating to an External Database sections of our online reference.

We strive to make both adoption and production usage as easy as possible, and if you have any questions, comments or suggestions, please don’t hesitate to drop us a line – either here or at teamcity-feedback at jetbrains dot com.

Technorati tags: , , , , , , , , , , , , , , ,

Build triggering: already existing and more upcoming in TeamCity 3.1

Thursday, January 31st, 2008

A flexible system of different build triggers in TeamCity allows to start the builds when it’s really necessary rather then use your company’s hardware resources at their most – running multiple builds at the same time and making you wait for the feedback on changes’ integration results.

Let’s now take a look at how TeamCity can help to “tame” builds clutter.

The most common case of firing a new build – changes committed to the version control system – can be altered by specifying a “quiet period” – time to pass with no changes in the build configuration VCS roots before TC starts a new build. In addition, you can use wildcards and operators to exclude parts of the VCS roots and ignore commits of particular users.

It’s quite common for many companies to create new builds periodically. In this case TeamCity can still limit the builds number if there are no changes pending to be built.

In TeamCity 3.1 which we plan to release soon, we’ve implemented more flexible build triggering options using Cron Expressions for more precise schedule tuning:

cronexpressiontrigger.jpg

You can also specify to start a new build when a successful build of a dependent build configuration appears or when the previous build has failed.

In-depth build triggering options are, as usual, explained in online reference.

Technorati tags: , ,, , , , , , ,

Labeling the VCS roots of finished builds

Monday, January 7th, 2008

TeamCity has two ways to label the build’s sources: automatic and manual one. So, let’s start with adding labels into the VCS for the build’s sources.

TeamCity can optionally add a label into the version control system for the sources used for a particular build. This can be useful, for example, when you need to have all the build’s sources to reproduce it. Opt to apply the VCS label for all builds or only for successful ones.

TeamCity supports VCS labeling for VCS roots managed by the following configuration management systems:

  • ClearCase,
  • CVS,
  • Perforce,
  • StarTeam,
  • Subversion.

The labeling takes place after the build’s finish and doesn’t affect the build status.

To enable the builds labeling:

  1. Navigate to Administration section, select the already existing project in the Projects list or start creating a new one.
  2. Go the step 2 “Version control settings” definition, select the labeling mode and save your changes.
  3. vcslabelingmode.png

Besides automatic build labeling, you can label sources used for a build manually. Navigate to the Build Results page, Changes tab and click Label this build sources link.
changestab.png

See more in TeamCity online reference.

Technorati tags: , , , , , , , , , , , ,

Analyzing thread dumps

Wednesday, December 19th, 2007

A useful feature helping to troubleshoot hangs and deadlocks in Java and .NET threads, is now available in TeamCity 3.0. You have a possibility to view stacktraces of all threads of all build’s processes on the build agent.

Taking a look at the thread dump can be an effective approach when detecting the leaves threads. The threads can be leaved as side effects of the system function or as a gap in some unit test.

TeamCity supports thread dumps for Microsoft .NET Framework 2.0 processes and Java 1.3 on Windows OS. On all other platforms it supports only Java from 1.5 and later.

To take a thread dump, find a running build on the Projects page, click it to navigate to the build results page and then click View thread dump link:

viewthreaddump.png

TeamCity tries to fetch the processes which take place at the moment and shows a window with a tree-like view of processes as well as their command line and stacktraces. Click the process name to investigate the the problem deeper.
Here is an example of how TeamCity represents both Java and .NET processes taking place when running a build.
Java process thread:

.NET process thread:

Note: If a build is running under Windows OS and Java 1.6, it uses a jstack utility to obtain a thread dump. This utility is also used to obtain thread dumps for all other platforms.

Have an untroubled and uninterrupted building!

Technorati tags: , , , , , ,, , ,